
SPHTM-IT has set up access to a Windows 10 Virtual Desktop Infrastructure (VDI) using the VMware Horizon Client on your computer.
Any documents created on the VDI should be saved using a connected USB drive, or a third-party online storage service through the Lab VDI (eg. or Microsoft OneDrive, Box, Google Docs, Dropbox).
All documents saved to the VDI will be DELETED upon logout.
Before you begin:
- Be sure all programs on your computer are closed because you will need to restart your computer during the implementation
- Mac users should make sure pop-up blockers are disabled during the installation; the pop-up blockers may be turned back on after the installation is complete
Steps:
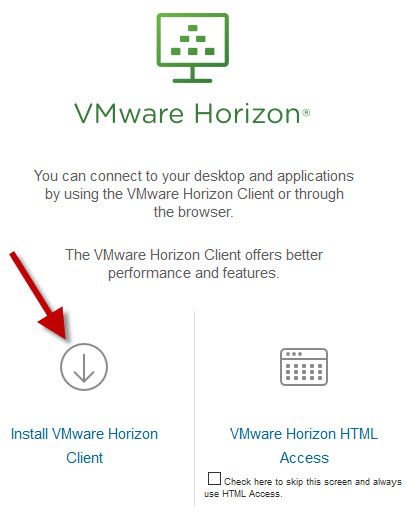
1. Go to: https://horizon.tulane.edu
2. Click on Install VMware Horizon Client
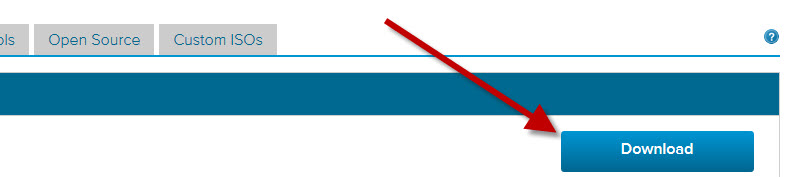
3. Choose the appropriate client for your machine (Mac or Windows) by clicking Go to Downloads

4. Click Download
5. Click Run or Save File
- If Save File, locate the file that was downloaded and double click to run, then select Yes to allow changes.
- ATTN Mac users: If a box pops up prompting you to put the setup client in the apps folder, you may simply close that box
6. If prompted, enter the computer administrator's user ID and password, or if you are the administrator, enter your own user ID and password
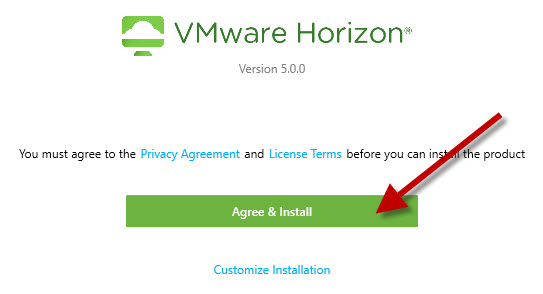
7. Click Agree & Install to agree to the license terms and install the software
8. The installation will take a few moments

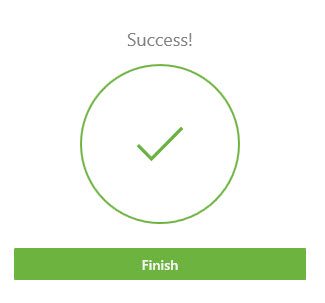
9. Once the installation is complete, a box will pop up to let you know; click Finish
10. To successfully complete the installation, choose Restart Now
11. After your computer restarts, find the VMware Horizon Client icon that was created on your desktop
12. Double-click the icon to open the application
13. Click on the New Server button or Double-Click the Add Server icon
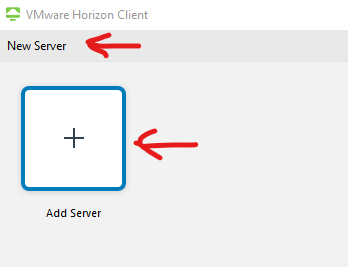
14. In the popup box, enter horizon.tulane.edu

15. When the Login screen appears, type in your Tulane Email credentials. Enter your full Tulane email address and click Next. Enter your password and click Login. You will then be prompted for Duo.

|

|

|
16. Once logged in, you will see the IE – Login EBS icon; click on this icon to open EBS/TAMS and log in as usual. You will also now see the list of available SPHTM Lab VDIs Student Lab SPHTM - MS Access, SAS, and SPSS Tulane IT ArcGIS Lab - ArcGIS Tulane IT STATA Lab - STATA
17. To add this icon to your desktop, right click and select Create Shortcut to Desktop, and on Mac, locate that in the new shortcut and drag it to the desktop.

If you will need to add attachments to any of your EIT's, continue. If not, this is the end of the installation.
- You should still be logged in:

- Click the gear icon on the far right of the VMWare window

- On the left side, select Sharing
- On the bottom, select Share your local files

3. On the left side, select Sharin4. On the bottom, select Share your local files
- Your name or use id will show up under the heading Folder/Drive
- You will see the folder pop up in the center window
- Click OK
This completed the installation and configuration.
The above steps are only required for the first time you log in.
For subsequent connections, you can log in directly by using the shortcut on the desktop. If you have any questions regarding the setup process, please contact the Service Desk at 988-8888.
